To track engagement activity for each recipient, every Marc must be linked to the correct person in your Roster (Google Sheet).
Each Marc has a unique Marc ID and QR code printed on a sticker, this is the only way to identify each device.
Before distribution — How to capture Marc ID → Recipient connection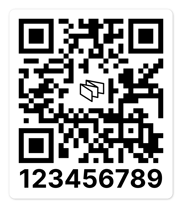
If shipping directly to recipients:
- Place the shipping label next to the Marc showing its Link Sticker (Marc ID + QR).
- Take a quick photo, this confirms which recipient receives which Marc.
- Then remove the sticker when packing the Marc (or keep it if needed).
If handing out in person:
- Write the recipient’s name directly on the sticker,
- Remove the sticker (or plastic sleeve) and save it (folder, backpack, envelope).
- Use it later to fill the Roster.
⚠ Once the sticker is removed and not recorded, there is no way to identify the Marc again.
Keeping an organized approach ensures accurate analytics.
How to complete the Roster (Google Sheet)
Open your Roster sheet → go to the Recipients tab → locate the first column labeled Marc ID.
For each row:
Marc ID: 9-digit code from sticker → Links device to recipient
Name: Recipient name → Replaces Marc ID in dashboard
Group: Sales rep, territory, region → Used in filtered reports
CRM ID: (Optional) Salesforce/HubSpot ID → Carried in raw data export
Sent Date: Date you sent it out → Filters out test opens before shipment
Best practice:
If shipped on 3/15, enter 3/16 as the “Sent” date to filter out any packing/testing opens.
Can we edit the Roster after it's sent?
Yes, any changes you make (Name, Group, Sent date) do not affect raw data.
The dashboard updates automatically within an hour.
How the Marc ID works in analytics
Once your first Marc is activated (opened), we will send you access to your dashboard.